


OVERVIEW:
Now that we are familiar with some of the git commands & their functionalities, it's time to get started with GitHub & its features. In this blog, I'll talk about:
- Cloning existing repositories via git.
- Setting up our GitHub account.
- configuring an SSH key, to keep track of repos via GitHub
Why use GitHub in the first place?
so let's start with the obvious question what exactly is GitHub or what does it do?
- The single thing that GitHub is known for is that it's a hosting platform for git repositories
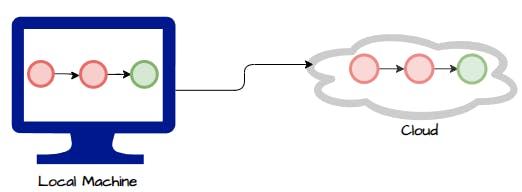
- GitHub allows us to put our git repositories in the cloud.
- We can access them from anywhere
- We can share them with people and we can collaborate with people.
 Why host it on a cloud platform like GitHub?
Suppose you rebooted your local machine without creating a backup of your code for any project you were working on, you'll simply lose it all. But if you've hosted everything on the cloud, it'll be super safe and you can clone all your code back again on your local machine (which we'll learn in a minute).
This is one of the many ways a cloud hosting platform comes in handy, making collaborations easy is another way it helps us.
It's important to know that GitHub is not the only option for some of these features. There are other options like git lab & BitBucket.
Cloning
What does cloning mean?
Getting a local copy of an existing repository on our local machine.
How do we do it?
- The only thing needed is the URL of the repository we want to clone.
Command:git clone <URL of repo>the
git clonecommand is not just limited to GitHub repositories, all kinds of repos on all kinds of cloud hosting platforms can be cloned using this.
Example: I have a DSA repository to keep up with it. Let's say I want to clone it on my local machine.
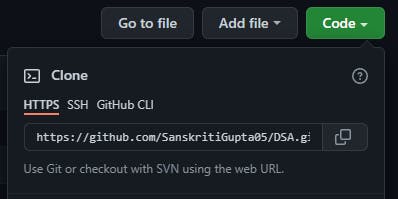
2 ways to copy the URL:
- Directly from the search bar

- Via clicking the
codebutton and copying the URL from there.
Then go to the git terminal and run the command:
git clone https://github.com/SanskritiGupta05/DSA.git
VOILA! You'll have a pre-existed repository on your local machine.
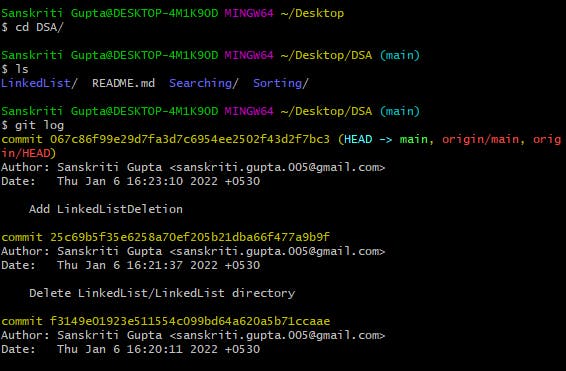
- cloned the repo -> got inside the repo using
cd->lscommand shows all the files inside that repo ->git logcommand shows all the previous commits made in the repository. (note that you can see commits made by anyone and everyone who contributed to that repo.)
Make sure that you're not already in a repository before cloning.
To read more about git cloning, checkout git clone documentation
Let's Register on GitHub:
To use GitHub we need to first sign-in on the platform. If you haven't made an account yet, you can go to github.com and create one. You'll need to:
- create a username.
- enter your email.
- enter a password

Then, after making an account go to the terminal and configure your e-mail there with the SAME e-mail you signed in with, on GitHub.
COMMAND: git config --global <Your e-mail>
It helps GitHub to -> Know who you are when you push up the code, it knows to use your profile and image and track your work.
Configure SSH Key:
You need to be authenticated on GitHub to do certain operations like pushing up code from your local machine. Your terminal will prompt you every single time for your GitHub email & password unless,
You generate & configure an SSH Key! Once configured, you can connect to GitHub without having to supply your username/password.
To do it you can go through the documentation by github or just follow these steps:
STEP-1: Check if you already have an existing SSH key.
- Open Terminal
- Enter
ls -al ~/.sshto see if existing SSH keys are present.
It lists the files in your .ssh directory, if they exist - By default, the filenames of supported public keys for GitHub are one of the following.
id_rsa.pub
id_ecdsa.pub
id_ed25519.pub
If you don't have an existing public & private key pair, then STEP-2 is to generate a new SSH key
STEP-2:
- Open terminal
- paste
ssh-keygen -t ed25519 -C "your_email@example.com"substituting in your GitHub email address.
- This generates public/private
ed25519key pair. - it asks to enter the file to save key in, which by default is -
(/c/Users/sai/.ssh/id_ed25519)  After I hit enter, the directory is being created to save the key. Now it's asking to enter a passphrase -> simply hit enter as for now -> then hit enter again.
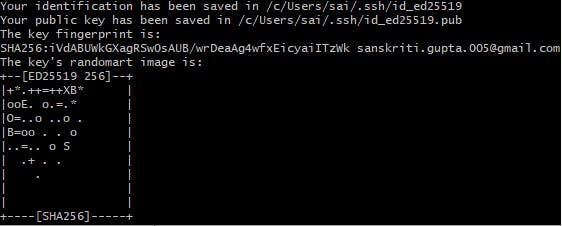
- It tells the user in which directories the
id&public keyhas been saved in. - It then tells the user Key fingerprint.
STEP-3: The next step is to add SSH key to the ssh-agent
(I'm doing it on the windows OS, steps might differ for this part if you're using other OS like Mac: Refer the docs for this.)
- start ssh-agent in the background
COMMAND:eval "$(ssh-agent -s)"
if output is something like:Agent pid 59566that means it's working. - Add your SSH private key to the ssh-agent. If you created your key with a different name, or if you are adding an existing key that has a different name, replace
id_ed25519in the command with the name of your private key file.
COMMAND:ssh-add ~/.ssh/id_ed25519
STEP-4: Next step is to add a new SSH key to our GitHub account.
- Copy the SSH public key to your clipboard.
COMMAND:clip < ~/.ssh/id_ed25519.pub
This copies the contents of theid_ed25519.pubfile to your clipboard. - Now go to your GitHub account -> go to your profile -> then go to settings -> go to SSH & GPG keys. -> Click on Add new SSH key.
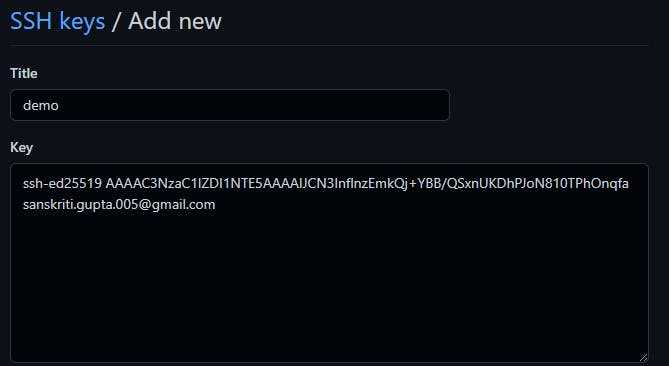 paste the contents copied to your clipboard there, give it a title and hit
 Add SSH key.
AWESOME! We finally have our key set up on GitHub 🎉
This is indeed a very crucial thing to do & now when we have finally done it we can push our repos via git on GitHub very easily, without any hassle (which we'll learn to do in the next blog🙌)
Please note that all of this was for demo purposes, I'm going to redo these steps again as you don't want to share your SSH keys with other users.
Do comment your feedback & share this blog! 😊✨